ProudNet.Eng
WebsiteProud ConsoleLanguage
  • 🌐ProudNet
    • ProudNet Introduction
    • Download and Install
      • How to verify your ProudNet license
      • AMI
    • Project Settings
      • C++
      • C#
      • Mac Xcode
      • Linux
      • Unity3D
        • iOS Build
      • Unreal Engine 4
      • Running the PIDL Compiler
    • Using ProudNet
      • Server and Client
        • Utilization of Server
        • Utilization of Client
      • RMI
        • Utilization of RMI
      • PIDL
        • Utilization of PIDL
      • Event handling
      • Communication messages
      • P2P Communication
        • Using P2P communication
    • Utilization of ProudNet
      • How to use
      • Tips for performance
    • Using DB in ProudNet
      • DB Cache System ver.2
        • DB Cache Theory and Understanding
        • Install DB Cache and Set Up Network
        • DB Cache Server and Client
        • DB Cache usage and application
          • Utilization of DB Cache
      • ADO API
      • ODBC API
    • ProudNet Utility
  • ProudNet Note
    • Technical Notes
      • Main Loop
      • Setting up a server firewall
      • Encryption and decryption
      • What to do in case of an error
      • List of error messages
      • Synchronizing Character Position
      • Client-Server Communication
      • MiniDump (Error Dump System)
      • [Version 1.6] Server-to-Server LAN Communicator
    • Glossary
    • Sample examples
  • 🌐Proud Service
    • Guide for Console
    • ProudChat
      • Download SDK
        • C++
        • C#
        • Unity3D
        • Unreal Engine 4
      • Features in Console
Powered by GitBook
On this page
  • Using Custom Build Rules
  • Using the Command Prompt (Command Prompt, cmd.exe)
  • Using Customizations
  • Using include or import in PIDL content
  • Marshaling
  • - Marshaling methods based on conditions
  • - Marshaling data in Bit
  • - Marshaling enum types
  • - Marshaling collections (arrays, etc.)
  • List of keywords
  • [C#] To pass a variety of parameters
  • Back
  1. ProudNet
  2. Using ProudNet
  3. PIDL

Utilization of PIDL

Last updated 1 year ago

Using Custom Build Rules

Display Name : the name that will be displayed in Custom Build Rules. ex) PIDL Rule File Name : create a rule filename. ex) PIDL_Custom_Build_Rule Directory : specify the location where the rule file will be saved. ex) C:\XXX\YYY
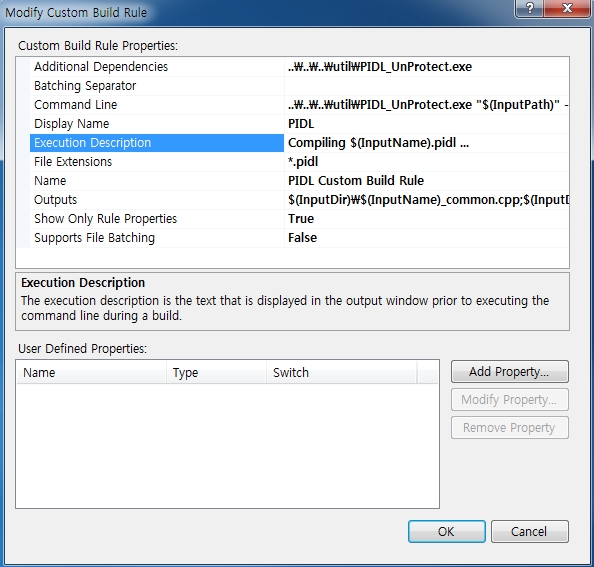
The details of each setting are as follows:

Additional Dependencies : ..\..\..\util\PIDL.exe
Batching Separator :
Command Line : ..\..\..\util\PIDL.exe "$(InputPath)" -outdir .\
Display Name : PIDL
Execution Description : Compiling $(InputName).pidl ...
File Extensions : *.pidl
Name : PIDL Custom Build Rule
Outputs : $(InputDir)\$(InputName)_common.cpp;$(InputDir)\$(InputName)_common.h;$(InputDir)\$(InputName)_proxy.cpp;$(InputDir)\$(InputName)_proxy.h;$(InputDir)\$(InputName)_stub.cpp;$(InputDir)\$(InputName)_stub.h

After completing the settings, a PIDL Build Rule is added to Custom Build Rules as follows.
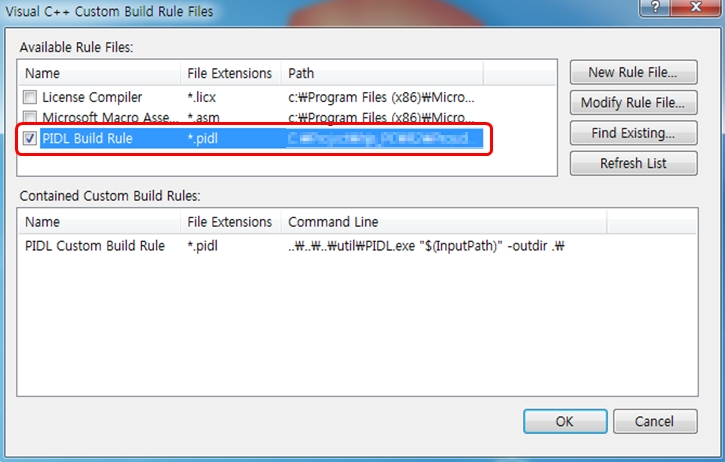
Check out the newly created rules file, and when you create a file in your project, you will see that the Build Tool is automatically selected as PIDL.

Using the Command Prompt (Command Prompt, cmd.exe)

If the PIDL AddOn or Custom Build Rules are not available, you can compile via command prompt on the Windows OS.

For cs, you can compile it with the PIDL -cs command.

  • PIDL.exe is located in the util folder of the ProudNet installation path.

  • Both Debug and Release must be set to the same.

  • Do not follow the example with the path to PIDL.exe, but set the path to PIDL in the path where ProudNet is installed.

  • In this example, we created a Common - PIDL folder and specified it as the PIDL compile path (outdir).

  • Please do not follow that include path, but specify the required path for your project.
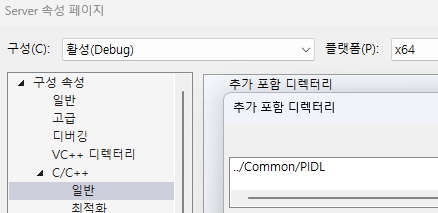
Check out the generated source files and include them in the Visual Studio project properties window to use them when you build.

Using Customizations

Visual Stuido 2005, 2008 version

  • One rule file with .rules extension

Visual Studio 2010 and later version

  • Three files are required: .props, .targets, and .xml. Unable to use the .rules file created from a previous version

Two ways to use customizations

1. After creating a project in Visual Studio 2005 or 2008, create a .rules file and set it to use, then convert the project to version 2010 or later. : When converting a project, .rules files are automatically converted to .props, .targets, and .xml.

2. Create .props, .targets, and .xml files and write your own XML code to use them

Visual Studio 2005, 2008 and Visual Studio 2010 and later versions have different defined macros. If the rule is not written in the macros used in the Visual Studio 2010 and later versions, you must convert to the macros used in the Visual Studio 2010 and later versions or modify .props, .targets, and .xml respectively after the conversion.

Using include or import in PIDL content

As you develop your programs, you may want to include or import statements in your .pidl file.

#include "a/b/c.h"
 
class MyStub // PIDL compilation output
{
    ...
}

To do this, use the following inside your PIDL content.

#include "a/b/c.h" 
// for C++ language. semicolon is mandatory!
import com.mycompany.mygame; // for Java

Marshaling

Using custom class types for RMI

// MyType.h
 
namespace Proud
{
    // The contents of the called RMI function are converted into a string and output.
    // Useful for creating logs.
    void AppendTextOut(String &a,const MyType &b);
 
    // Reads the contents of a custom type from the message buffer.
    CMessage& operator>>(CMessage &a, MyType &b);
 
    // Put the contents of the custom type into the message buffer.
    CMessage& operator<<(CMessage &a, const MyType &b);
}
 

Inside ProudNet's RMI functionality, we are using Proud.CMessage. And RMI parameters are marshaled through overloading of the above functions. Proud.CMessage is being used here. Proud.CMessage holds the message data used by ProudNet to turn RMIs into messages or read parameters from messages, and is used as a stream object.

An example of implementing a stream in a marshaling function is as follows.

namespace Proud
{
    CMessage& operator>>(CMessage &a, MyType &b)
    {
        a>>b.x,b.y>>b.z>>b.w;
        return a;
    }
    CMessage& operator<<(CMessage &a, const MyType &b)
    {
        // Do not use a.UseInternalBuffer()!
        a<<b.x,b.y<<b.z<<b.w;
        return a;
    }
    void AppendTextOut(String &a,const MyType &b)
    {
        String f;
        f.Format(L"{x=%f,y=%f,z=%f,w=%f}",b.x,b.y,b.z,b.w);
        a+=f;
    }
}

Finally, before including the proxy and stub files created by the PIDL compiler, the header file where the above overloaded methods are declared must be included first.

// Example1
#include "MyType.h"
#include "MyPIDL_proxy.h"
 
// Example2
#include "MyType.h"
#include "MyPIDL_stub.h"

See <installed folder>/sample/CustomTypeMarshal or <Sample/CasualGame/GCServer/FarmCommon.h> for examples of actual implementations. To verify that your own marshalling functionality works, use Proud.TestMarshal().

After serialising and sending the CFastArray on the C++ side, the C# side receives it, deserializes it, and uses it to proceed to step 5. In this example, the C# client calls an RMI called Ping, and the C++ server that receives it calls the StudentList RMI, passing a CFastArray in C++ to the C# side, which receives it as a List.

(1) Writing a C# Student class

namespace CsClient
{
    class Student
    {
        public string Name;
        public int ID;
        public int Kor;
        public int Eng;
        public int Mat;
        public override string ToString()
        {
            return string.Format("Name: {0}({1}) K: {2}, E: {3}, M: {4}", Name, ID, Kor, Eng, Mat);
        }
    }
} 

(2) Writing a C++ CStudent class

class CStudent
{
    public:
    Proud::String Name;
    int ID;
    int Kor;
    int Eng;
    int Mat;
}; 

(3) Writing a PIDL

S2C.PIDL

rename cs(Proud::CFastArray<CStudent>, System.Collections.Generic.List<CsClient.Student>);
[marshaler(cs)=CsClient.MyMarshaler]
global S2C 3000
{
    StudentList([in] Proud::CFastArray<CStudent> students);
} 

Line1: The rename keyword is used for PIDL communication between different languages. The name must include the Namespace.

Line2: Specify the marshaler to be used on the C::side with the marshaler(cs) keyword. The name must include the Namespace.

Line5: Create a StudentList PIDL. Basically, just write it as you would on the C++ side.

C2S.PIDL

[marshaler(cs)=CsClient.MyMarshaler]
global C2S 4000
{
    Ping([in] int value);
} 

This example PIDL code sends a StudentList when a client pings it, and you can build it to create a .h, .cpp and .cs file.

(4) Writing C++ marshaling code

Code for marshaling a CStudent class created as an example.

namespace Proud
{
    CMessage& operator >> (CMessage& msg, CStudent student)
    {
        msg >> student.Name >> student.ID >> student.Kor >> student.Eng >> student.Mat;
        return msg;
    }
    CMessage& operator << (CMessage& msg, const CStudent& student)
    {
        msg << student.Name << student.ID << student.Kor << student.Eng << student.Mat;
        return msg;
    }
} 

This is the code that sends the StudentList when a ping is sent from the C# client.

class C2SStub : public C2S::Stub
{
    public:
    DECRMI_C2S_Ping;
};
 
DEFRMI_C2S_Ping(C2SStub)
{
    {
        CriticalSectionLock(g_lock, true);
        g_S2CProxy.StudentList(remote, RmiContext::ReliableSend, g_Students);
    }
    return true;
}
C2SStub g_C2SStub; 

(5) Writing C# marshaling code

Marshalling in C# is developed by inheriting, implementing, and replacing Nettention.Proud.Marshaler and works with the keyword marshaler(cs)=CsClient.MyMarshaler declared in the PIDL without having to do it yourself.

namespace CsClient
{
    class MyMarshaler : Nettention.Proud.Marshaler
    {
        public static bool Read(Message msg, out List<Student> students)
        {
            students = null;
            if (!msg.ReadScalar(out var size))
            {
                return false;
            }
            students = new List<Student>();
            for (int i = 0; i < size; ++i)
            {
                Student s = new Student();
                if (!msg.Read(out s.Name)) { return false;
                }
                if (!msg.Read(out s.ID))
                {
                    return false;
                }
                if (!msg.Read(out s.Kor))
                {
                    return false;
                }
                if (!msg.Read(out s.Eng))
                {
                    return false;
                }
                if (!msg.Read(out s.Mat))
                {
                    return false;
                }
                students.Add(s);
            }
            return true;
        }
 
        public static void Write(Message msg, List<Student> students)
        {
            msg.WriteScalar(students.Count);
            for (int i = 0; i < students.Count; ++i)
            {
                msg.Write(students[i].Name);
                msg.Write(students[i].ID);
                msg.Write(students[i].Kor);
                msg.Write(students[i].Eng);
                msg.Write(students[i].Mat);
            }
        }
    }
} 
g_S2CStub.StudentList = (remote, rmiContext, students) =>
{
    lock(g_lock)
    {
        // You can do this by using students passed into List<Student>.
        foreach (var s in students)
        {
            Console.WriteLine(s.ToString());
        }
    }
    return true;
};

- Marshaling methods based on conditions

There are ways to marshal information about a character in an RMI parameter where each field is valid or invalid for different types of characters. You can implement different marshalling using switch/case statements or polymorphism of objects. Below is an example of using swich/case.

- Marshaling data in Bit

You can marshal data in bits to reduce the amount of data stored in the message. Proud.CMessage has the following methods of storing data in bit units.

Method
Description

Proud.CMessage.ReadBits

Read in bit

Proud.CMessage.WriteBits

Write in bit

Precautions of marshaling data in bits

The number of bits you want to record should not be outside the range of the actual value you want to record. For example, if you want to write an int and the value inside is actually negative, the first bit is 1. In this case, if you try to write 31 bits or less to reduce the amount of bits, the value of the first bit will be missing, so be aware of this when doing reading/writing in bits.

- Marshaling enum types

To marshal an enum type, implement a function like the one below.

enum type { ... } ;
 
namespace Proud
{
    inline CMessage& operator<<(CMessage& a,type b)
    {
        a<<(int)b;
        return a;
    }
    inline CMessage& operator>>(CMessage& a,type& b)
    {
        int x;
        a>>x;
        b=(type)x;
        return a;
    }
    inline void AppendTextOut(String &a,type b)
    {
        String txt;
        txt.Format(L"%d",(int)b);
        a+=txt;
    }
}

By using the macro PROUDNET_SERIALIZE_ENUM already defined in ProudNet, the above implementation can be easily accomplished as follows.

PROUDNET_SERIALIZE_ENUM(type)

- Marshaling collections (arrays, etc.)

ProudNet provides you with the ability to marshal a few basic types of collections (e.g., arrays). It supports Proud.CFastArray, Proud.CFastMap, std.vector and CAtlArray.

See the operator>>, operator<< override in marshaler.h for more details.

// Below is an example of declaring an array type in PIDL.
Foo([in] Proud::CFastArray<MyType> a, [in] std::vector<MyType> b);

If you want to marshal for a collection type that ProudNet does not yet support, use the following routine as a guide to write it.

List of keywords

Name of keyword
Description
Example usage

access

[C#] Setting access to proxy and stub classes in a namespace

[access=Permission name]

byval

Passing parameters as value

P2PChat([in] Proud::String a, [in, byval] int b);

global

Namespace access (currently global only)

global Simple 2000 { ... }

in

Enter parameters

Chat([in] string txt);

include

[C#] Insert include into the result

#include "a/b/c.cpp"

marshaler

[C#] Marshaller for custom types

[marshaler(cs) = SimpleCSharp.CMyMarshaler]

mutable

Passing a parameter as mutable (:=reference)

Chat([in, mutable] string txt);

private

[C#] Setting access to proxy and stub classes in a namespace

[access=private]

protected

[C#] Setting access to proxy and stub classes in a namespace

[access=protected]

public

[C#] Setting access to proxy and stub classes in a namespace

[access=public]

rename

Compiling with substitutions in a specific environment

rename cs(Proud::String, System.String);

using

[C#] Insert the using keyword in the result

using(cs) System.XXX;

[C#] To pass a variety of parameters

global Namespace name 2000 
{
    Function name([in] int Variable name);
}

When PIDL is written as above, the PIDL compiler compiles it as follows for the base type.

namespace Namespace name
{
    class Proxy : public ::Proud::IRmiProxy
    {
    public:
        virtual bool Function name( ::Proud::HostID remote, ::Proud::RmiContext& rmiContext , const int& Variable name) PN_SEALED; 
        ...
    }
}

If you want to change the delivery method, use the keywords below.

Name of keyword
Example (PIDL)
Example (output)

None

Chat([in] int val);

...Chat(..., const int& val)...

byval

Chat([in, byval] int val);

...Chat(..., const int val)...

mutable

Chat([in, mutable] int val);

...Chat(..., int& val)...


can be used to create rule files

Can be used/cannot be created using

example of using swich/case
namespace Proud
{
    enum UnitType
    {
        Zergling,     // StarCraft's juggling (ground type normal attack unit)
        Queen,        // Queen of Starcraft (Flying Special Technology Use Unit)
        Broodling    // A short-lived attack unit created by Queen using her brudling skills
    };
 
    struct Unit
    {
        UnitType m_type;          // Unit's type
        Vector2D m_position;    // Unit;s location
        int m_energy;            // Unit's energy (or mana) reserves -> Queen only
        float m_lifeTime;        // Unit's survival time limit -> Bridling only
        int m_attackPower;        // Unit's attack power->Juggling only
    };
 
    CMessage& operator<<(CMessage& msg,const Unit& unit)
    {
        msg<<unit.m_type<<unit.m_position;
        switch(unit.m_type)
        {
        case Zergling:
            msg<<unit.m_attackPower;
            break;
        case Queen:
            msg<<unit.m_energy;
            break;
        case Broodling:
            msg<<unit.m_lifeTime;
            break;
        }
        return msg;
    }
 
    CMessage& operator>>(CMessage& msg,Unit& unit)
    {
        msg>>unit.m_type>>unit.m_position;
        switch(unit.m_type)
        {
        case Zergling:
            msg>>unit.m_attackPower;
            break;
        case Queen:
            msg>>unit.m_energy;
            break;
        case Broodling:
            msg>>unit.m_lifeTime;
            break;
        }
        return msg;
    }
}
Example
namespace Proud
{
    struct MyType
    {
        int x,y,z;
    };
    CMessage& operator>>(CMessage &a, MyType &b)
    {
        // Use 6 bits to read the x value
        a.ReadBits(b.x,6);
        // Use 3 bits to read the y value
        a.ReadBits(b.y,3);
        // Use 15 bits to read the z value, i.e. sum 6+3+15=24 bits (3 bytes)
        a.ReadBits(b.z,15);
        return a;
    }
    CMessage& operator<<(CMessage &a, const MyType &b)
    {
        a.WriteBits(b.x,6); // Store x,y,z values in bits.
        a.WriteBits(b.y,3);
        a.WriteBits(b.z,15);
        return a;
    }
}

If you need marshaling of collection types other than those defined by default in marshaler.h, you will need to implement an override corresponding to the collection you need. For this, see or marshaler.h for examples already implemented.

example of marshaling std.vector
namespace Proud
{
    // Serialisation functions available in vector
    // for output to stream
    template<typename elem>
    inline CMessage& operator>>(CMessage &a, std::vector<elem> &b)
    {
        // Get the size.
        int size;
        a >> size;
 
        // Raise an exception if the size is unacceptable.
        // You may suspect that it has been hacked.
        if (size<0 ||size >= CNetConfig::MessageMaxLength)
            ThrowExceptionOnReadArray(size);
 
        // To reduce memory fragments
        b.reserve(size);
        b.resize(0);
 
        // Reads the array items one by one.
        elem e;
        for (int i = 0;i < size;i++)
        {
            a >> e;
            b.push_back(e);
        }
        return a;
    }
 
    // Serialisation functions available 
    // for unary item elem such as vector, list, etc.
    // for input from stream
    template<typename elem>
    inline CMessage& operator<<(CMessage &a, const std::vector<elem> &b)
    {
        // Record the size of the array.
        int size = (int)b.size();
        a << size;
        
        // Record each array argument.
        for (std::vector<elem>::const_iterator i = b.begin();i != b.end();i++)
        {
            a << (*i);
        }
        return a;
    }
 
    template<typename elem>
    inline void AppendTextOut(String &a, std::vector<elem> &b)
    {
        a += L"<vector>";
    }
}

🌐
➡️
➡️
➡️
⬅️
Back
Custom Build Rules
Custom Build Rules
Writing a C# Student class
Writing a C++ CStudent class
Writing a PIDL
Writing C++ marshaling code
Writing C# marshaling code
Using custom class types for RMI
Custom Build Rule setting
Custom Build Rules
Common - set outdir to PIDL, then set it to an additional include directory