如何使用PIDL
使用Custom Build Rules
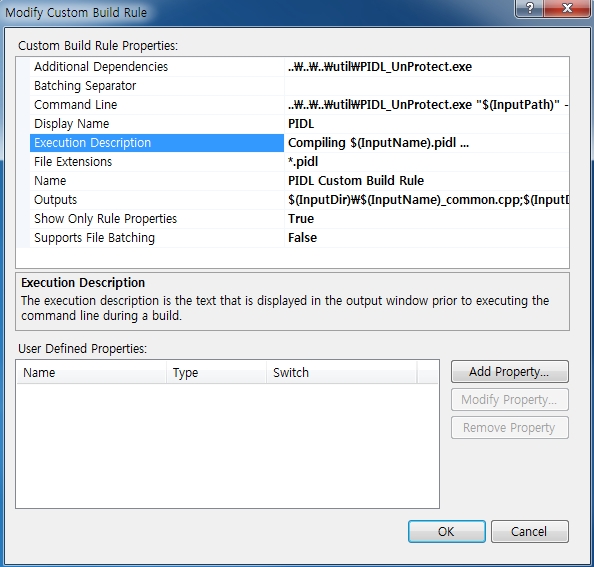
Display Name : 這是將在自訂建置規則中顯示的名稱。 例如) PIDL 規則 File Name : 建立規則檔名。 例如)PIDL_Custom_Build_Rule Directory : 指定規則檔案的儲存位置。 例如) C:\XXX\YYY

各項設定的詳細資訊如下。
Additional Dependencies : ..\..\..\util\PIDL.exe
Batching Separator :
Command Line : ..\..\..\util\PIDL.exe "$(InputPath)" -outdir .\
Display Name : PIDL
Execution Description : Compiling $(InputName).pidl ...
File Extensions : *.pidl
Name : PIDL Custom Build Rule
Outputs : $(InputDir)\$(InputName)_common.cpp;$(InputDir)\$(InputName)_common.h;$(InputDir)\$(InputName)_proxy.cpp;$(InputDir)\$(InputName)_proxy.h;$(InputDir)\$(InputName)_stub.cpp;$(InputDir)\$(InputName)_stub.h
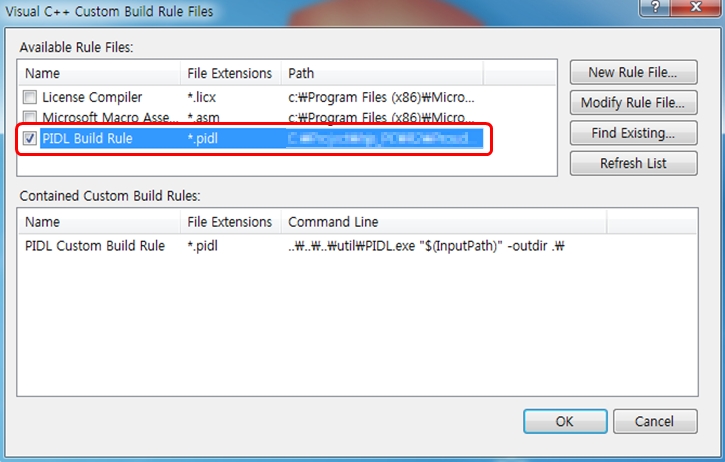
完成設定後,在自訂建置規則中新增一條PIDL建置規則,如下所示。

如果您檢查新建立的規則文件並在專案中建立文件,您將看到 PIDL 被自動選擇為建置工具。
使用命令提示字元(Command Prompt, cmd.exe)
如果 PIDL AddOn 或自訂建置規則不可用,您可以透過 Windows 作業系統上的命令提示字元進行編譯。

對於cs,可以透過新增PIDL -cs命令來編譯。

PIDL.exe位於ProudNet安裝路徑的util資料夾中。
Debug, Release必須設定相同。
不要依照範例寫PIDL.exe的路徑,而是設定為ProudNet安裝路徑的PIDL。
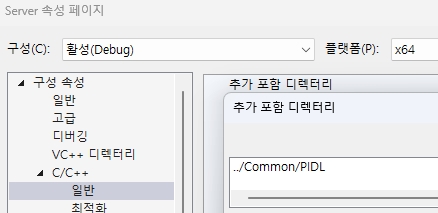
在此範例中,建立了 Common - PIDL 資料夾並將其指定為 PIDL 編譯路徑 (outdir)。
請不要遵循包含路徑,而是指定您正在使用的項目所需的路徑。

您可以透過檢查產生的來源檔案(將它們包含在 Visual Studio 專案屬性視窗中,然後建置)來使用它。
使用Customizations
2種使用customizations的方法
1. 在 Visual Studio 2005 或 2008 中建立專案後,建立 .rules 檔案並將其設定為使用,然後將專案轉換為 2010 或更高版本的方法 : 轉換專案時,.rules 檔案會自動轉換為 .props, .targets, .xml。
2. 生成.props, .targets, .xml文件後直接編寫xml代碼使用的方法
Visual Studio 2005、2008和Visual Studio 2010之後的版本具有不同的定義宏觀。 如果該規則未以Visual Studio 2010後版本中使用的宏觀編寫,則轉換前應將其轉換爲Visual Studio 2010後版本中使用的宏觀,或轉換後分別修改.props, .targets, .xml。
在 PIDL 內容中使用include或import
開發程序時,有時想要在.pidl文件中加入include或import語句。
#include "a/b/c.h"

class MyStub // PIDL 編譯輸出
{
    ...
}
為此,請在 PIDL 內容中使用以下內容:
#include "a/b/c.h"
// for C++ language. semicolon is mandatory!import com.mycompany.mygame; // for Java編組
在 RMI 中使用自訂類別類型
// MyType.h

namespace Proud
{
    // 被呼叫的RMI函數的內容被轉換為字串並輸出。
    // 建立日誌時很有用。
    void AppendTextOut(String &a,const MyType &b);

    // 從訊息緩衝區讀取自訂類型的內容。
    CMessage& operator>>(CMessage &a, MyType &b);

    // 將自訂類型內容插入訊息緩衝區。
    CMessage& operator<<(CMessage &a, const MyType &b);
}
在 ProudNet 的 RMI 功能中,我們使用 Proud.CMessage。 RMI 參數是透過重載上述函數來編組的。 這裡使用的是Proud.CMessage。 Proud.CMessage包含ProudNet中用於將RMI轉換為訊息或從訊息中讀取參數的訊息數據,並用作流物件。
在封送處理函數中實現流的範例如下:
namespace Proud
{
    CMessage& operator>>(CMessage &a, MyType &b)
    {
        a>>b.x,b.y>>b.z>>b.w;
        return a;
    }
    CMessage& operator<<(CMessage &a, const MyType &b)
    {
        // 不要使用a.UseInternalBuffer()!
        a<<b.x,b.y<<b.z<<b.w;
        return a;
    }
    void AppendTextOut(String &a,const MyType &b)
    {
        String f;
        f.Format(L"{x=%f,y=%f,z=%f,w=%f}",b.x,b.y,b.z,b.w);
        a+=f;
    }
}
最後,在包含在 PIDL 編譯器中建立的代理程式和存根檔案之前,必須先包含宣告上述重載方法的頭檔。
// 例1
#include "MyType.h"
#include "MyPIDL_proxy.h"

// 例2
#include "MyType.h"
#include "MyPIDL_stub.h"實際實現的範例請參考<安裝資料夾>/sample/CustomTypeMarshal 或<Sample/CasualGame/GCServer/FarmCommon.h>。 若要檢查您自己的編組函數是否有效,請使用 Proud.TestMarshal()。
如果您從 C++ 端序列化並傳送 CFastArray,C# 端會接收它、反序列化它,並在步驟 5 中使用它。 在此範例中,當從 C# 用戶端呼叫名為 Ping 的 RMI 時,接收它的 C++ 伺服器呼叫 StudentList RMI 並將 C++ 的 CFastArray 傳送到 C#,而 C# 將其作為 List 接收。
(1) 編寫 C# Student 類
namespace CsClient
{
    class Student
    {
        public string Name;
        public int ID;
        public int Kor;
        public int Eng;
        public int Mat;
        public override string ToString()
        {
            return string.Format("Name: {0}({1}) K: {2}, E: {3}, M: {4}", Name, ID, Kor, Eng, Mat);
        }
    }
}
(2) 編寫 C++ CStudent 類
class CStudent
{
    public:
    Proud::String Name;
    int ID;
    int Kor;
    int Eng;
    int Mat;
};
(3) 編寫 PIDL
S2C.PIDL
rename cs(Proud::CFastArray<CStudent>, System.Collections.Generic.List<CsClient.Student>);
[marshaler(cs)=CsClient.MyMarshaler]
global S2C 3000
{
    StudentList([in] Proud::CFastArray<CStudent> students);
} Line1: rename關鍵字用於不同語言之間的PIDL通訊。 這個名稱必須包含命名空間。
Line2: marshaler(cs) 關鍵字指定在 C:: 端使用的封送拆收器。 這個名稱必須包含命名空間。
Line5: 建立一個 StudentList PIDL。 基本上,您可以像在 C++ 中使用它一樣編寫它。
C2S.PIDL
[marshaler(cs)=CsClient.MyMarshaler]
global C2S 4000
{
    Ping([in] int value);
}
此範例 PIDL 程式碼是當客戶端發送 ping 時發送 StudentList 的 PIDL 程式碼。建立檔案以建立 .h, .cpp, .cs 檔案。
(4) 編寫 C++ 編組程式碼
此程式碼封送作為範例建立的 CStudent 類別。
namespace Proud
{
    CMessage& operator >> (CMessage& msg, CStudent student)
    {
        msg >> student.Name >> student.ID >> student.Kor >> student.Eng >> student.Mat;
        return msg;
    }
    CMessage& operator << (CMessage& msg, const CStudent& student)
    {
        msg << student.Name << student.ID << student.Kor << student.Eng << student.Mat;
        return msg;
    }
}
當 C# 客戶端發送 ping 時,此程式碼會傳送 StudentList。
class C2SStub : public C2S::Stub
{
    public:
    DECRMI_C2S_Ping;
};

DEFRMI_C2S_Ping(C2SStub)
{
    {
        CriticalSectionLock(g_lock, true);
        g_S2CProxy.StudentList(remote, RmiContext::ReliableSend, g_Students);
    }
    return true;
}
C2SStub g_C2SStub;
(5) 編寫 C# 編組程式碼
C#中的Marshaling是透過繼承並實作Nettention.Proud.Marshaler然後替換它來開發的,它透過PIDL中聲明的marshaler(cs)=CsClient.MyMarshaler關鍵字進行操作,無需您自己進行操作。
namespace CsClient
{
    class MyMarshaler : Nettention.Proud.Marshaler
    {
        public static bool Read(Message msg, out List<Student> students)
        {
            students = null;
            if (!msg.ReadScalar(out var size))
            {
                return false;
            }
            students = new List<Student>();
            for (int i = 0; i < size; ++i)
            {
                Student s = new Student();
                if (!msg.Read(out s.Name)) { return false;
                }
                if (!msg.Read(out s.ID))
                {
                    return false;
                }
                if (!msg.Read(out s.Kor))
                {
                    return false;
                }
                if (!msg.Read(out s.Eng))
                {
                    return false;
                }
                if (!msg.Read(out s.Mat))
                {
                    return false;
                }
                students.Add(s);
            }
            return true;
        }

        public static void Write(Message msg, List<Student> students)
        {
            msg.WriteScalar(students.Count);
            for (int i = 0; i < students.Count; ++i)
            {
                msg.Write(students[i].Name);
                msg.Write(students[i].ID);
                msg.Write(students[i].Kor);
                msg.Write(students[i].Eng);
                msg.Write(students[i].Mat);
            }
        }
    }
} g_S2CStub.StudentList = (remote, rmiContext, students) =>
{
lock(g_lock)
{
// 您可以使用傳遞給 List<Student> 的學生。
foreach (var s in students)
{
Console.WriteLine(s.ToString());
}
}
return true;
};- 基於條件的編組方法
有一種方法可以在 RMI 參數中編組字元訊息,每個欄位在不同的字元類型之間有效或無效。 您可以使用 switch/case 語句或物件多態性來實現各種封送處理。
- 以位元為單位編組數據
若要減少訊息中儲存的資料量,您可以逐位封送資料。 Proud.CMessage 有以下方法以位元為單位儲存資料。
Proud.CMessage.ReadBits
以位元爲單位讀取
Proud.CMessage.WriteBits
以位元為單位寫入
位元級資料編組的注意事項
您要記錄的位數不得超出您要記錄的實際值的範圍。 例如,如果您嘗試記錄一個 int,但 int 內部的值實際上是負數,則第一位是 1。 在這種情況下,如果嘗試記錄少於31位元以減少位數,則第一位的值將被省略,因此在逐位讀取/寫入時要小心。
- 編組enum類型
若要封送enum類型,請實作下列函數。
enum type { ... } ;

namespace Proud
{
    inline CMessage& operator<<(CMessage& a,type b)
    {
        a<<(int)b;
        return a;
    }
    inline CMessage& operator>>(CMessage& a,type& b)
    {
        int x;
        a>>x;
        b=(type)x;
        return a;
    }
    inline void AppendTextOut(String &a,type b)
    {
        String txt;
        txt.Format(L"%d",(int)b);
        a+=txt;
    }
}透過使用ProudNet中已定義的巨集PROUDNET_SERIALIZE_ENUM,可以如下輕鬆完成上述實作。
PROUDNET_SERIALIZE_ENUM(type)- 編組集合(陣列等)
ProudNet 已準備好編組幾種基本集合(陣列等)類型。 支援 Proud.CFastArray, Proud.CFastMap, std.vector , CAtlArray。
// 下面是在 PIDL 中聲明數組類型的範例。
Foo([in] Proud::CFastArray<MyType> a, [in] std::vector<MyType> b);
如果需要 marshaler.h 中預設定義的集合類型以外的集合類型,則需要實現與所需集合相對應的重載。為此,請參閱使用 RMI 的自訂類別類型或 marshaler.h 以了解已實現的範例。
當您想要封送 ProudNet 尚未支援的集合類型時,請參閱下列例程。
關鍵字列表
access
[C#] 設定命名空間中代理程式和存根類別的存取權限
[access=權限名稱]
byval
將參數作為值傳遞
P2PChat([in] Proud::String a, [in, byval] int b);
global
命名空間存取權限(目前僅支援全域)
global Simple 2000 { ... }
in
輸入參數
Chat([in] string txt);
include
[C#] 將包含插入到輸出中
#include "a/b/c.cpp"
marshaler
[C#] 用於使用者定義類型的封送拆收器
[marshaler(cs) = SimpleCSharp.CMyMarshaler]
mutable
將參數作為可變參數傳遞(:=引用)
Chat([in, mutable] string txt);
private
[C#] 設定命名空間中代理程式和存根類別的存取權限
[access=private]
protected
[C#] 設定命名空間中代理程式和存根類別的存取權限
[access=protected]
public
[C#] 設定命名空間中代理程式和存根類別的存取權限
[access=public]
rename
在特定環境下透過替換編譯
rename cs(Proud::String, System.String);
using
[C#] 將 using 關鍵字插入輸出中
using(cs) System.XXX;
[C#] 想要傳遞多種參數時
global 名稱空間名稱 2000
{
    函數名稱([in] int 變數名);
}
當PIDL如上所寫時,PIDL編譯器編譯基本類型如下。
namespace 名稱空間名稱
{
    class Proxy : public ::Proud::IRmiProxy
    {
    public:
        virtual bool 函數名稱( ::Proud::HostID remote, ::Proud::RmiContext& rmiContext , const int& 變數名) PN_SEALED;
        ...
    }
}
想要更改傳遞方式時,請使用以下關鍵詞。
無
Chat([in] int val);
...Chat(..., const int& val)...
byval
Chat([in, byval] int val);
...Chat(..., const int val)...
mutable
Chat([in, mutable] int val);
...Chat(..., int& val)...
⬅️ 返回
Last updated