# AMI

ProudNet AMI 是在 EC2 執行個體上使用預設設定所建立的 <mark style="color:orange;">Amazon Machine Image(AMI)</mark>。

> 每個 ProudNet 設備同時使用者的無限授權身份驗證\
> 安裝執行使用 ProudNet 開發的伺服器程式所需的所有程式
>
> \
> \&#xNAN;***Windows Server AMI***
>
> * Visual C++ 2015\~2019 x64 可再發行包
> * DotNet Core 3.1
> * DotNet 5.0<br>
>
> ***CentOS7 AMI***
>
> * unixODBC-devel
> * openssl-devel
> * wget
> * mono-complete
> * Development Tools ( installed by yum groupinstall )
> * CMake
> * DotNet Core 3.1 SDK ( 包括運行時 )
> * DotNet 5.0 ( 包括運行時 )
> * dotnet-sos \
>   : 分析在 Linux 上建立的 .Net Core 程式的轉儲檔案。
> * lldb<br>
>
> ***Linux CentOS7 AMI***
>
> * 它預設為在發生崩潰時留下核心轉儲。

***

## 使用 ProudNet AMI 建立 EC2 執行個體

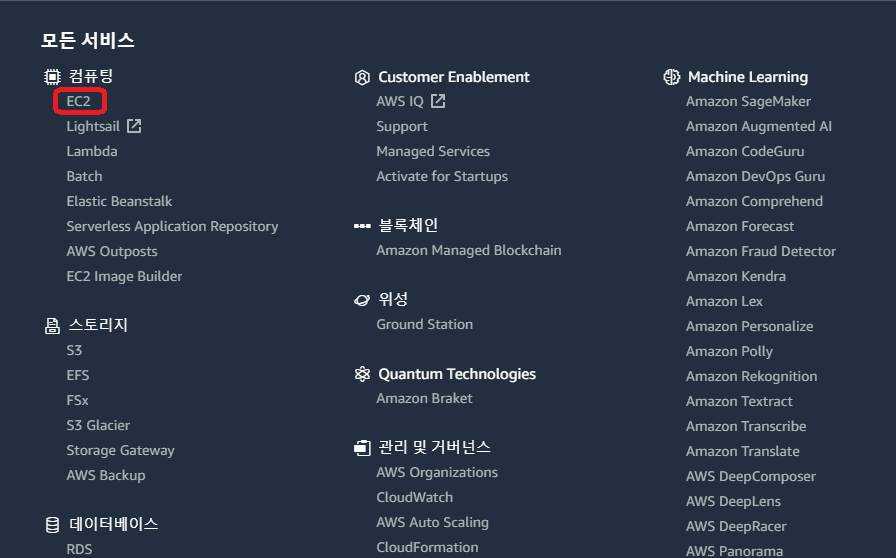
1. 轉到 EC2 服務。

<figure><img src="/files/nRogUqZxoWB0X7ak0eMr" alt=""><figcaption></figcaption></figure>

&#x20;

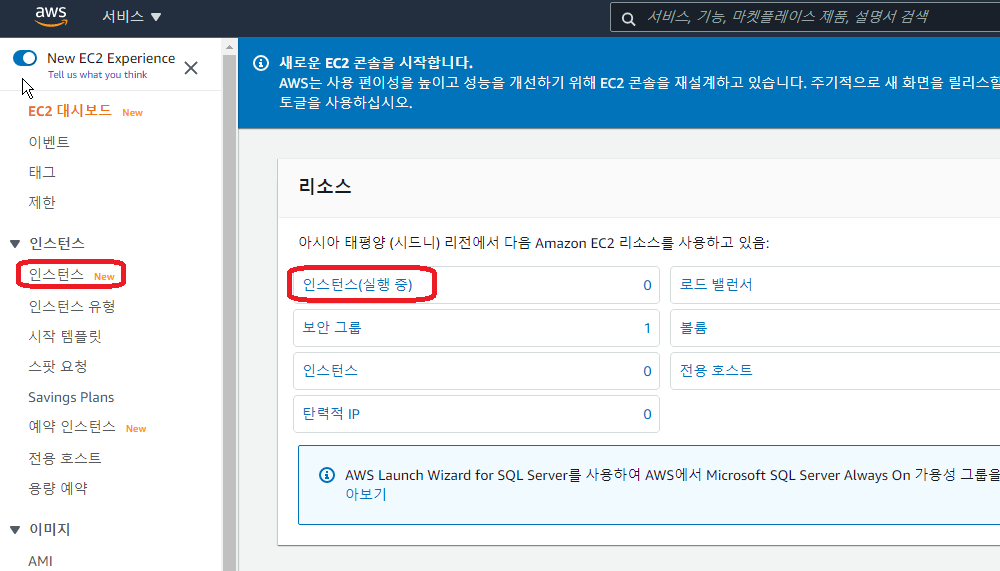
2. 在 EC2 頁面上，選擇執行個體選單。

<figure><img src="/files/pUfiLZmArHepLXH7I0v2" alt=""><figcaption></figcaption></figure>

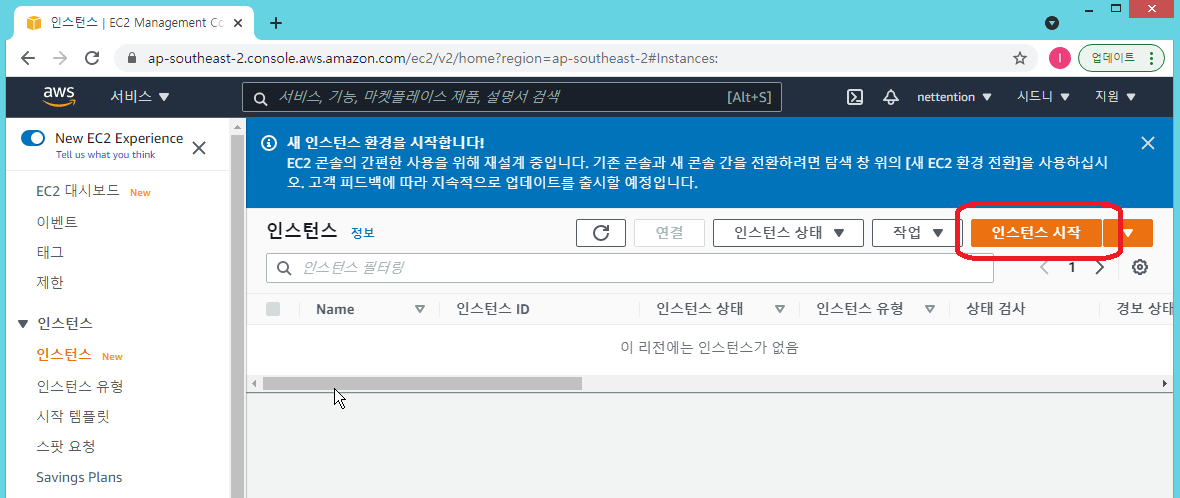
3. 在實例頁面，按一下右上角&#x7684;***啟動實例***&#x6309;鈕。

<figure><img src="/files/k0HTgocVLWYwy27ofHrM" alt=""><figcaption></figcaption></figure>

&#x20;

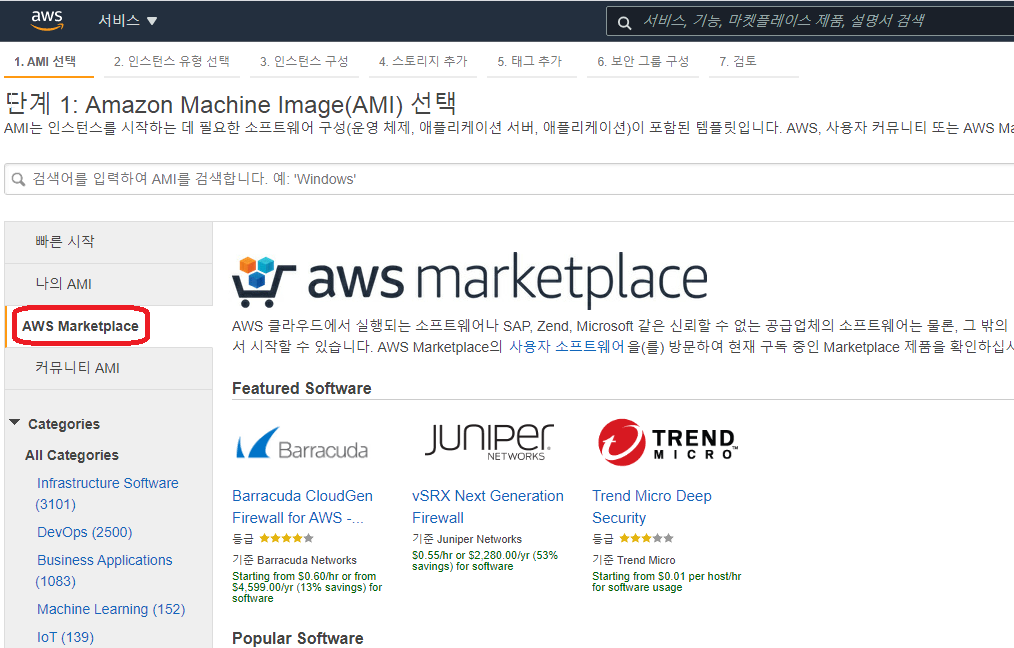
4. ***步驟 1：***&#x5728; ***AMI 選擇***&#x9801;面上，選擇左側的 ***AWS Marketplace*** 標籤。

<figure><img src="/files/ZbcsvzBRBiThjhX1KcXJ" alt=""><figcaption></figcaption></figure>

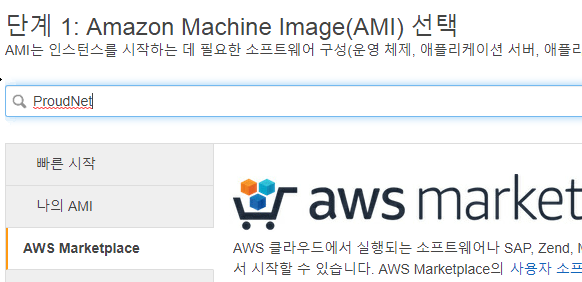
5. 在搜尋欄中輸入 ***ProudNet***。

<figure><img src="/files/zlQO0umuQ5ATJ58uq8II" alt=""><figcaption></figcaption></figure>

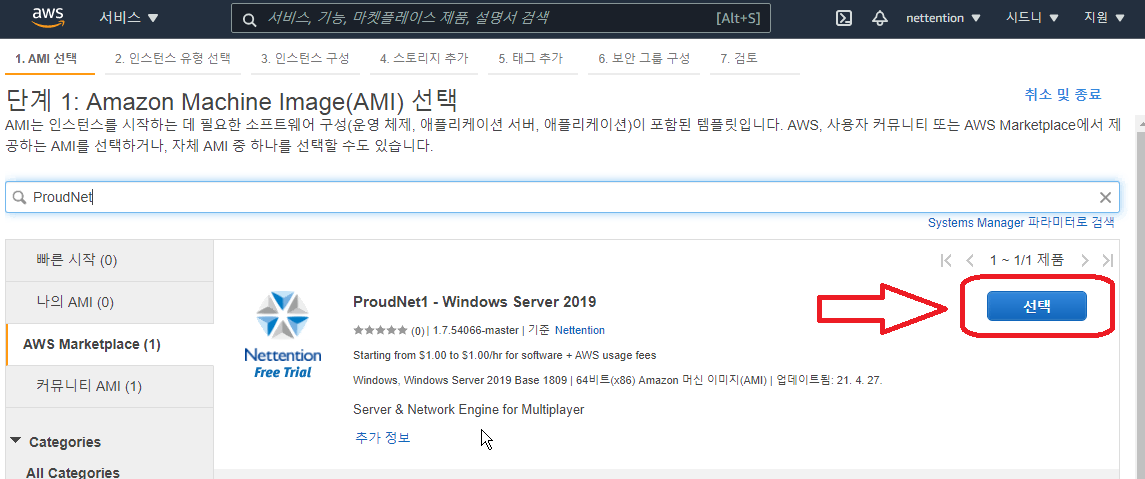
6. 在搜尋中找到的 PN1 AMI 中，按一下所需作業系統的 AMI 旁&#x7684;***選擇***&#x6309;鈕。

<figure><img src="/files/cZkTBLZFEWDZTvMFVHpS" alt=""><figcaption></figcaption></figure>

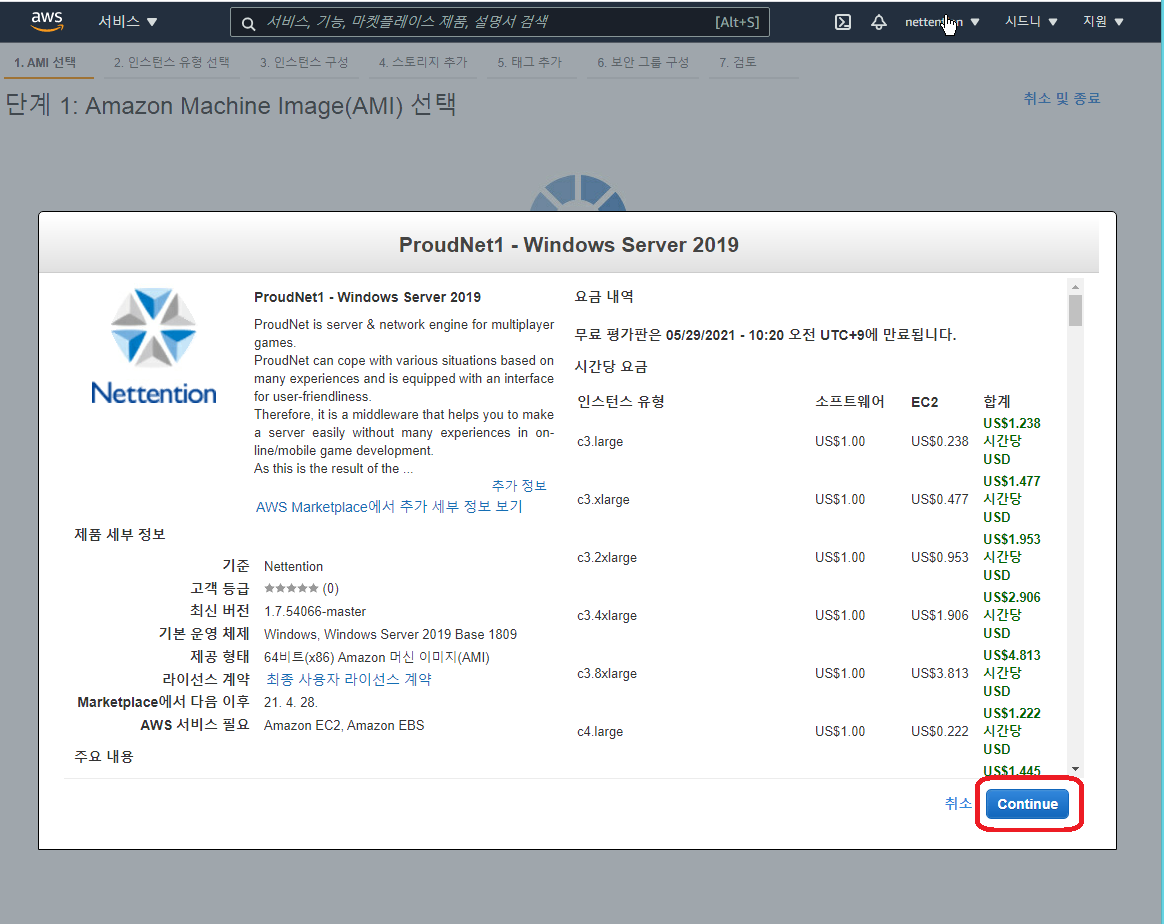
7. 將顯示相應 PN1 AMI 的詳細說明。 如果點選右下角的Continue按鈕，就會出現一般的EC2建立頁面（效能選擇、金鑰對註冊等）。

<figure><img src="/files/hsVidru9QJB4mNg5Fi1j" alt=""><figcaption></figcaption></figure>

{% hint style="warning" %}
系統會自動建立名稱以字串 **ProudNet1** 開頭的安全性群組，並將其套用至使用上述方法建立的 EC2。 此安全群組僅允許 TCP 和 UDP 的入站連接埠 9,000-9,100，並允許所有出站流量。\
\
\- **Windows版本的情況** \
若要使用 RDP，您需要將 TCP 3389 連接埠新增至入站規則。\
\
\- **Linux版本的情況**\
若要使用 SSH，您必須將 TCP 22 連接埠新增至入站規則。 如果提前預設添加，可能會成為安全漏洞。\
\
指定靜態分配模式下 P2P 的伺服器偵聽連接埠和 UDP 連接埠時，請在 9,000 - 9,100 範圍內選擇和使用連接埠。
{% endhint %}

***

## Windows Server EC2 執行個體

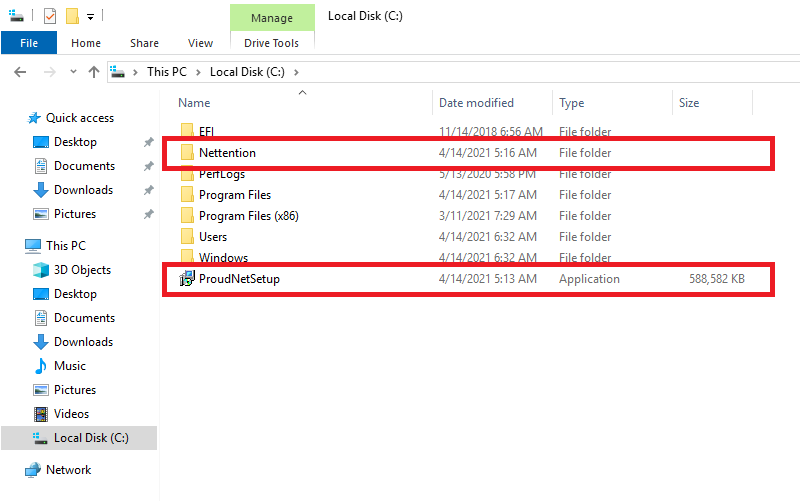
<figure><img src="/files/Iw9X22hYfAjgje9JtsCg" alt=""><figcaption></figcaption></figure>

透過RDP遠端連線到建立的EC2實例。\
如上圖所示，C:\下方有一個<mark style="color:orange;">Nettention 資訊夾</mark>和<mark style="color:orange;">ProudNetSetup 安裝檔</mark>。

若要使用 ProudNet Windows AMI 進行 Auto Scaling 等，請依照下列步驟操作。

> 1. 建立 EC2 執行個體時，將使用元資料和使用者資料。
> 2. 透過使用者數據，您的伺服器可執行檔案和執行所需的檔案將根據開發所使用的語言插入到以下位置。\
>    \
>    :arrow\_right: **如果伺服器是使用.NET或.NET Core開發的**\
>    將伺服器執行檔和執行所需的檔案放置在 <mark style="color:orange;">C:\Nettention\ProudNet\Sample\bin\netcoreapp3.1</mark> 中。\
>    \
>    :arrow\_right: **如果伺服器是C++開發的**\
>    將伺服器執行檔和執行所需的檔案放在<mark style="color:orange;">C:\Nettention\ProudNet\lib${platform}\dll${Configuration}</mark>。\
>    (您也可以將其放在 <mark style="color:orange;">C:\Nettention\ProudNet\Sample\bin\Release</mark> 中。)
> 3. 如果啟動後立即插入伺服器可執行文件，則插入的伺服器可執行檔將透過使用者資料執行。

{% hint style="warning" %}
若要在開發 PC 上本機使用 ProudNet，請透過 [**ProudNet Github**](https://github.com/nettention/proudnet) 下載並使用安裝檔。
{% endhint %}

***

## Linux（CentOS7）EC2實例

當連接到建立的CentOS7實例時，可以看到<mark style="color:orange;">root directory( / )</mark>下有一個ProudNet資料夾。

若要使用 ProudNet Linux AMI 進行 Auto Scaling 等，請依照下列步驟操作。

> 1. 建立 EC2 執行個體時，將使用元資料和使用者資料。
> 2. 透過使用者數據，根據開發所使用的語言，將伺服器可執行檔和執行所需的檔案插入到以下位置。 \
>    \
>    :arrow\_right: **如果伺服器是使用.NET或.NET Core開發的** \
>    將伺服器執行檔和執行所需的檔案放在<mark style="color:orange;">/ProudNet/bin/${Configuration}</mark>。\
>    您必須包含所有發布結果，而不僅僅是建立結果。 如果您開發的程式名稱為**project**，不僅需要包含<mark style="color:orange;">project.dll</mark>，還需要包含<mark style="color:orange;">project.deps.json</mark>和<mark style="color:orange;">project.runtimeconfig.json</mark>。 如果是Release版本，則為<mark style="color:orange;">/ProudNet/bin/Release</mark>。\
>    \
>    :arrow\_right: **如果伺服器是C++開發的**\
>    將伺服器執行檔和執行所需的檔案放在<mark style="color:orange;">/ProudNet/lib/x86\_x64-linux/${Configuration}</mark>中。
> 3. 如果啟動後立即插入伺服器可執行文件，則插入的伺服器可執行檔將透過使用者資料執行。

{% hint style="warning" %}
若要在開發 PC 上本機使用 ProudNet，請透過 [**ProudNet Github**](https://github.com/nettention/proudnet) 下載並使用安裝檔。
{% endhint %}

{% hint style="info" %}
有關 EC2 元資料和使用者資料的信息，請參閱以下連結中的 AWS 手冊。

**參考:** [**AWS docs**](https://docs.aws.amazon.com/en_us/AWSEC2/latest/UserGuide/ec2-instance-metadata.html)&#x20;
{% endhint %}

***

## 在 CloudFormation 中使用

如果您使用 ProudNet1 AMI 使用 AWS CloudFormation 進行內部建模和預先配置，則在建立堆疊時可以使用下列路徑中提供的範本。

{% hint style="info" %}
如果您想了解有關使用 AWS CloudFormation 進行內部建模和配置的更多信息，請參閱 AWS 手冊頁面。

**參考:** [**AWS docs**](https://docs.aws.amazon.com/AWSCloudFormation/latest/UserGuide/Welcome.html)&#x20;
{% endhint %}

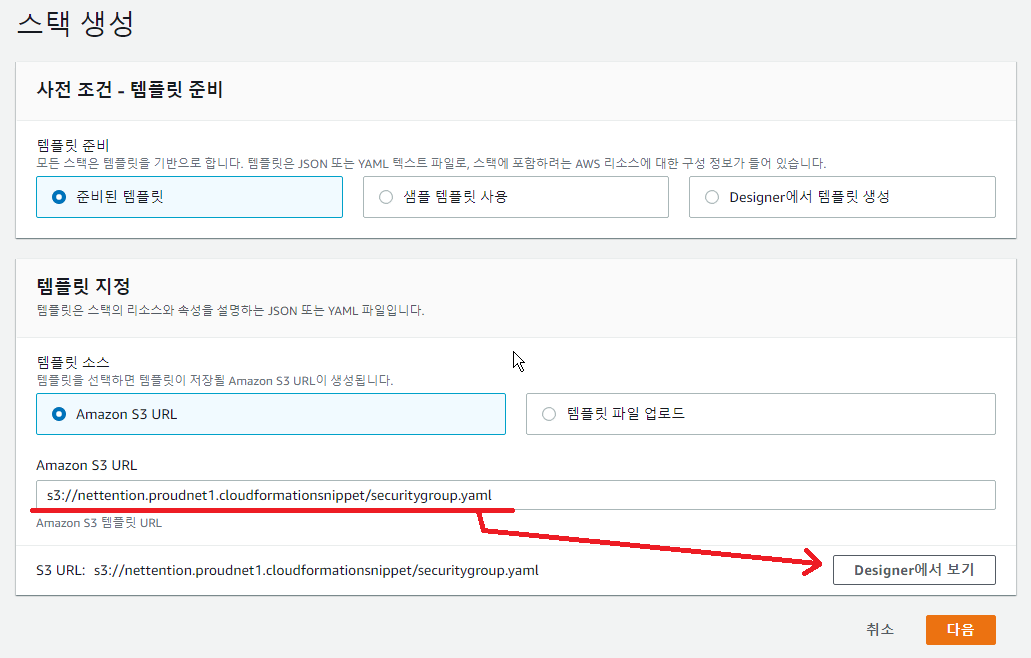
提供的範本包含 ProudNet 的 <mark style="color:orange;">SecurityGroup</mark> 設定。

如下圖所示，您可以在建立堆疊時輸入 S3 URL，然後按一下 ***Designer中的檢視*** 按鈕以查看所提供範本的全文。

<figure><img src="/files/seWd1Z2WOiLm7j38jkna" alt=""><figcaption></figcaption></figure>


---

# Agent Instructions: Querying This Documentation

If you need additional information that is not directly available in this page, you can query the documentation dynamically by asking a question.

Perform an HTTP GET request on the current page URL with the `ask` query parameter:

```
GET https://docs.proudnet.com/proudnet.cn/proudnet/1.download/ami.md?ask=<question>
```

The question should be specific, self-contained, and written in natural language.
The response will contain a direct answer to the question and relevant excerpts and sources from the documentation.

Use this mechanism when the answer is not explicitly present in the current page, you need clarification or additional context, or you want to retrieve related documentation sections.